Wednesday, February 1, 2012

Gringo Nacho Casserole


I got creative again. I was a little late with dinner tonight and needed to do something quick and easy with stuff I had on hand. The result is this casserole that my guys absolutely loved. My hubbie said it was so awesome he could eat the whole thing by himself. I call it "gringo" because I used mild taco seasoning and that's the spiciest thing in this dish. I call it "nacho" because of the tortilla chips and cheese. There were no leftovers. :-)

Gringo Nacho Casserole
Copyright 2012 Brendilly Bakes, All rights reserved

Yield: 6-8 servings
Prep time: 15-20 mins.
Baking time: 30-35 mins.

1-1/2 lbs. Lean Ground Turkey
1-1/2 teaspoons Kosher Salt
1 teaspoon freshly ground Black Pepper
1 Tablespoon Onion Powder
1 pkg. Mild Taco Seasoning
8 oz. Cream Cheese, softened
1/2 cup Greek Yogurt
1 can Green Beans, drained
1 cup Frozen Peas
1 cup Frozen Corn
3-4 handfuls of Tortilla Chips
1 cup shredded Colby Jack Cheese

1. Preheat oven to 350 degrees F. and spray a 9x13" casserole dish with nonstick cooking spray.
2. In a large skillet over med-hi heat, brown the turkey with the salt, pepper, and onion powder.
3. Once meat is browned, turn off heat and mix in the taco seasoning, incorporating it well into the meat.
4. Add cream cheese and mix until well combined.
5. Add yogurt and vegetables, and mix until well combined.
6. Pour mixture into the casserole dish. Crush tortilla chips over the top, and top the chips with the shredded cheese.
7. Bake 30-35 mins. or until bubbly and slightly browned on top.
8. Remove from oven and serve immediately.


Sour Cream and Guacamole would be great accompaniments, as well as a tossed green salad.
Tuesday, January 31, 2012

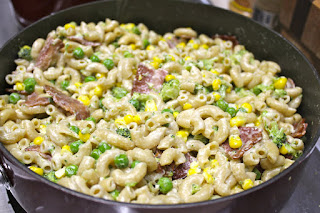
Alfredoroni

Alfredo sauce is one of my favorite things in the world. Back in the day I made it with creme cheese and it was a rather labor intensive process. For the past few years though I've used a drastically simplified method, and one that may actually be closer to the real thing. Not being Italian, though, I'm not completely sure. I just know that it's REALLY good. I probably make one version or another of this almost once a week. This one was pretty different in that I used elbow macaroni instead of penne or rotini. My youngest said I should use the elbow macaroni all the time. Let's see what YOU think.

Alfredoroni
Copyright 2012 Brendilly Bakes, All rights reserved


Yield: 6-8 Servings
Prep time: 15 minutes
Cooking time: 20 minutes

Ingredients
8 slices Turkey Bacon, cooked and coarsely chopped
1 Tablespoon Unsalted Butter
1 Tablespoon Olive Oil
3 cloves Garlic, chopped
2 cups Heavy Cream
1-1/2 cups frozen Broccoli, chopped
1 cup freshly grated Parmigiano Reggiano (plus more for sprinkling)
1 cup frozen Corn
1 cup frozen Peas
Salt, Pepper, and Nutmeg to taste
1# Whole Wheat Elbow Macaroni

Directions
1. Start a large pot of water to boiling. Once it boils, add a good handful of salt and macaroni, boil for 9-10 minutes or until pasta is al dente.
While the water is boiling:
2. In large skillet or saucepan with sides, place butter, olive oil, and garlic.
3. Turn heat to medium. Once the butter melts, stir garlic and oils, and cook the garlic for just a minute or two.
4. Add broccoli and a little salt and pepper to the pan, and sauté for another minute.
5. Add heavy cream, parmesan cheese, a little more salt and pepper, and nutmeg. Stir and bring to a simmer.
6. Add peas, corn, and bacon and taste for seasonings. Bring back to a simmer and simmer gently until pasta is done, stirring occasionally.
7. Once pasta is done, drain and add to the sauce, stirring gently until everything is well combined. Turn off heat and serve immediately - with a sprinkling of cheese if desired.


Even my picky eater makes short work of this one.

Grande Quesadilla

I felt like being a little adventurous today (adventurous for me anyway) with lunch. My oldest son asked for a quesadilla and for him that means tortilla, cheese, and refried beans if we have them - that's it. I, on the other hand, like a little more variety. We DID have some homemade refries on hand as well as; avocado, tomato, and some corn. I thought those all sounded like the makings of a great quesadilla. Here's what I did. Keep in mind I was only making one quesadilla. Just increase the amounts for more.

Grande Quesadillas
by Brendilly Bakes

Yield: 1 quesadilla
Prep time: 10 minutes
Cook time: 7-10 minutes

2 Whole Wheat Tortillas
Butter for buttering tortillas
Refried Beans (I used my own homemade - the recipe is on the blog - you could use canned if that's all you have on hand).
1/2 of a small Avocado, thinly sliced
3 slices of a Roma Tomato, diced
1/4 cup frozen Corn
Shredded Colby Jack cheese (desired amount)
Salt and Pepper to taste

1. Butter one side of one tortilla and place buttered side down on a cold griddle.
2. Spread one large spoonful of beans on the tortilla and spread slightly, then sprinkle with a good handful of cheese.
3. Make a ring of avocado slices around the edge of the tortilla, fill in the center with tomato slices, and sprinkle with kosher salt and freshly ground pepper to your taste.


4. Sprinkle corn on top of tomatoes and cover with another handful of cheese (or the amount you desire).
5. Butter one side of the other tortilla and place butter side up on top of the vegetables.
6. Turn your griddle on to 300 and cook until the first side of your quesadilla is browned to your liking. Flip carefully and cook until the other side is browned and cheese is melted.


Serve with sour cream and enjoy!


Some other really tasty fillings I'd like to try are; bacon, grilled mushrooms and/or onions, black olives.... I often use black olives and bacon in quesadillas, but all of these ingredients combined could be amazing. Hmmmm.....quesadillas for supper?? ;-)

Monday, January 30, 2012

Orange Cream Cake

The inspiration for this cake came from one of my favorite bloggers, The Brown Eyed Baker. She did this with root beer.

As you may or may not have noticed, a lot of my cooking revolves around what my husband likes because I just adore him and enjoy cooking to his taste as much as possible. Well, my sweetie LOVES orange creme anything; creamsicles, soda, candy...all of it. So, I got to thinking about making an orange creme version of this root beer cake. This was the result


Orange Cream Cake
Copyright 2011 Brendilly Bakes, All rights reserved

Yield: One 10" bundt cake
Prep Time: 30 minutes
Bake Time: 35-40 minutes

Cake Ingredients
2 cups Orange Cream soda (do not use diet soda)
1- 4 cup serving size pkg. Vanilla Pudding Mix
1/2 cup Unsalted Butter, cut into 1" pieces
1 cup Granulated Sugar
2 cups All-Purpose Flour
1- 1/4 teaspoons Baking Soda
1 teaspoon Salt
Zest of 1/2 Orange
2 Eggs

Frosting Ingredients
2 ounces White Chocolate, melted and cooled slightly
1/2 cup Unsalted Butter, softened
1 teaspoon Salt
1/4 cup Orange Cream Soda
1 - 4 cup serving size pkg. Vanilla Pudding Mix
2 cups Powdered Sugar
Zest of 1/2 Orange

Cake Directions
1. Preheat oven to 325 degrees F. Generously spray the inside of a 10-inch bundt pan with nonstick cooking spray, or butter the pan and dust with flour, shaking out the excess flour; set aside.
2. In a medium saucepan, heat the soda, pudding mix and butter over medium heat until the butter is melted. Add the sugars and whisk until dissolved. remove from the heat and let cool.
3. In a medium bowl, whisk the flour, baking soda and salt together.
4. In a small bowl, whisk the eggs until just beaten, then whisk them into the cooled pudding mixture until combined. Gently fold the flour mixture into the pudding mixture. The batter will be slightly lumpy, which is okay. Do not overbeat it, as it could cause the cake to be tough.
5. Pour the batter into the prepared pan and bake for 35-40 minutes, until a tester inserted into the middle of the cake comes out clean. Transfer the pan to a wire rack to cool completely. Gently loosen the sides of the cake from the pan and turn it out onto the rack.

Frosting Directions
1. Place all frosting ingredients into the bowl of a stand mixer and mix on medium-low until combined and satiny smooth.
2. Use a spatula to spread the frosting over the cake in a thick layer. Let the frosting set before serving. Store leftovers wrapped well or in an airtight container at room temperature.

NOTE: If you are using a dark, nonstick pan, heat the oven to 300 degrees F.

As you may have figured out, this cake is very sweet and moist. It's not something you'd want to eat on a regular basis, but for a special dinner with friends it's perfect. Which is exactly what I made this for, and I'm excited to say it was a hit. My friends don't mind being my guinea pigs, and after this one they were no less eager than before. :-)


I sprinkled some orange sugar on top just for fun.

See What I'm Pinning!

Follow Me on Pinterest